
As a professor at one of the leading colleges in Canada, Humber College, I often find my self teaching new users software and having to relay complex workflows in simple and easy to understand pieces. To help aid in this I have created info graphics that show some of the simple concepts that can then be used in more complex situations as part of the whole. Below are some of those info graphics with a description of the problem that is addressed and a solution that can be used to address it. Note that these only show a solution as there are always many ways to address any given need.
Epic Games wrote a blog post about how I’m using these in the classroom. You can find it here UE4 Blog.

Blending textures with vertex colours (Colors if you prefer):
A great way to reduce needed texture space is to use tileable textures across large areas of a mesh or multiple meshes. The problem with this is you can end up with what looks like a tiled texture that is reapeating over and over. You also don’t specific textures changes where you might want them.
The example below is a road and I was looking to have gravel areas and areas where it looked more dry and cracked. Painting a single texture for the entire road would result in a massive texture having to load or ending up with obvious pieces of road looking exactly the same as the last. In the example I solve these problems with three generic tileable textures that don’t have any specific details in them. Each texture can then be tiled to the desired size, in the example below they are all tiled the same but could be changed to have each tiled a different amount. The three textures are then using Lerp nodes to blend each one together that is simpliar to having three layers of texture in Photoshop.
Vertex colours are now used as a mask, or layer mask in Photoshop, to blend the textures together where needed. Vertex colours can be painted in your game level directly on the mesh to blend which texture you need in each area.

Below is a completed material with the three tileable textures with their normal maps as well as specular and roughness channels being controlled. Convert inputs to parameters so that instanced materials can be used and controlled quickly adding more variation to your levels.

The image below is almost entirely created with tileable textures and vertex colour blending.

Procedural Geometry Based Clouds:
There are a number of ways of creating clouds and this is just one of them. The clouds are created with a sphere primitive in Unreal Engine that is scaled to the size needed. The material that is then added using a procedural noise and displacements to create a puffy looking cloud object. To further enhance the look the shader is set to Subsurface to allow light to pass through the clouds at the edges making them look illuminated from above. It is a simple trick that can be expanded on and create some wonderful looking clouds for your levels.

Random Pulsing Emissive Texture:
There is no example of the final product here but what I was after was a simple way to create a flickering gas lantern effect using an emissive texture. The solution be below uses two sine curves to control the output of the Emissive channel that can be control for the effect that you are after. Once again this is only one solution to the problem and there are several others that can be used.

Simple Water Material:
Water is always nice to have in your scene as it brings it to life and give depth to the textures. The solution below is a very simple starting point to creating ripples on the water that are moving in a given direction. A ripple normal map is used twice and blended together at slightly different angles and are moving at different speeds. This creates a bit of randomization in the ripples.

Tiling, Offsetting and Multiplying a texture map:
This is a more in-depth example of tiling a texture that is shown in the first info graphic. Here we are not only tiling the texture but also adding an offset feature for moving the texture in the UV coordinates. Ensure that you are creating parameters from the inputs so material instances can be created and reused with different settings.

World Aligned Texture & Normal
The World Aligned Texture and Normal nodes allow for textures to be projected in world space along three axes. This means that objects do not have to have texture coordinates (unwrap).
When objects are scaled the texture will not scale with them allowing for texture detail to remain the correct size. Also when objects are moved the texture will remain in world space which allows ground objects to tile cleanly.

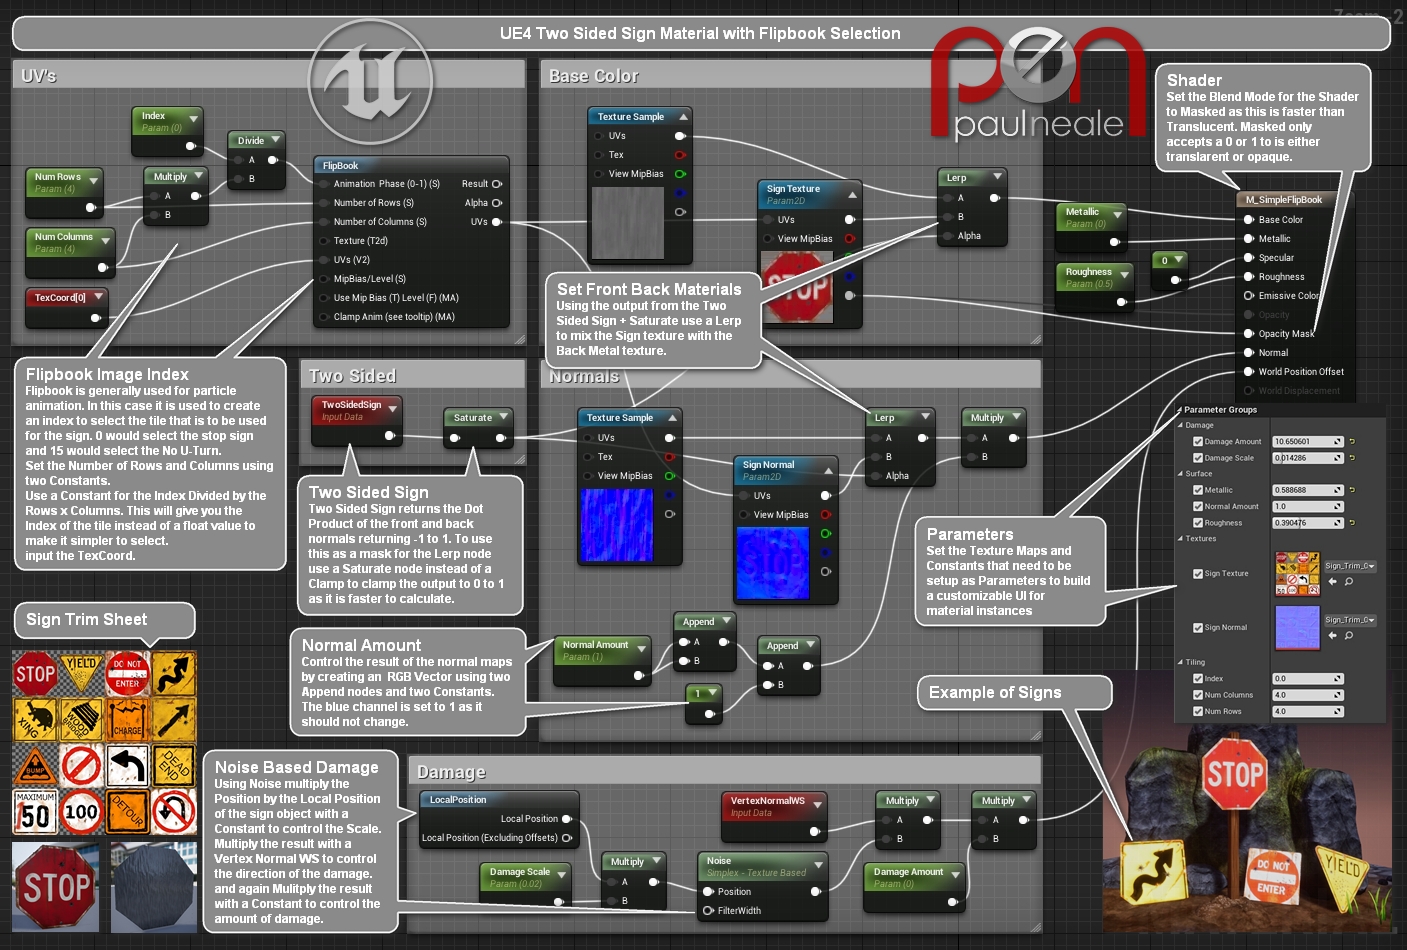
Double Sided Sign with a Select-able Tile Sheet
The sign material uses a double sided material that displays two different textures, one on the front and one on the back. This means we can have a simple plane as the sign.
We are also using a tile sheet of signs and the tiling and offset properties are setup so the number of tiles can be set with the Num Tiles constants and then the Offset constants control which tile is showing. All four of these values need to be considered Integers and not floats. We don’t have that option in materials how ever.
This material can be utilized in an Actor BP and a single Integer value can be used to control which tile is shown. This will be shown in another Info Graphic.
Thanks goes to Haydn Roff for pointing out the Two Sided Sign node.

Completed material with added control for Metallic, Roughness and Damage.

Sign Material with Indexed Selection using Flipbook
Was having a look at how to explain the math in my more complex Sign material that I use in production and was wonder how to explain the math behind setting up an index and realized I could do it with the Flipbook node. This isn’t as optimized as what I have setup how ever it works perfectly well.
Animated Burning wood Texture
The material below will create the look of wood smoldering by using two tiled burning maps that are mixed together. One is panning over time and the other is rotating. This creates what looks like a more random feel. Blend Overlay the result with the burning wood trim map and and control both the Base Color and Emissive with the final solution.


For over 2 decades, I have been recognized internationally by the 3D animation industry as technical director and rigging specialist for clients worldwide, my work spans feature films, TV series, AAA game titles, broadcast television, aerospace, medical and tools and pipeline development.